As an online business owner, you have plenty of options when it comes to shopping cart software, but they don’t all produce the same results. Many solutions are simply a place for a buyer to add products, tally a total purchase price, and submit payment.
The better shopping cart solutions do more than just facilitate sales. They promote a user-friendly buying experience that drives conversions and boosts customer average purchases.
In this article, we will review the different types of shopping carts, how to install them on your existing website, and how you can increase sales.
Online Shopping Cart Software vs Conversion Optimization Tools
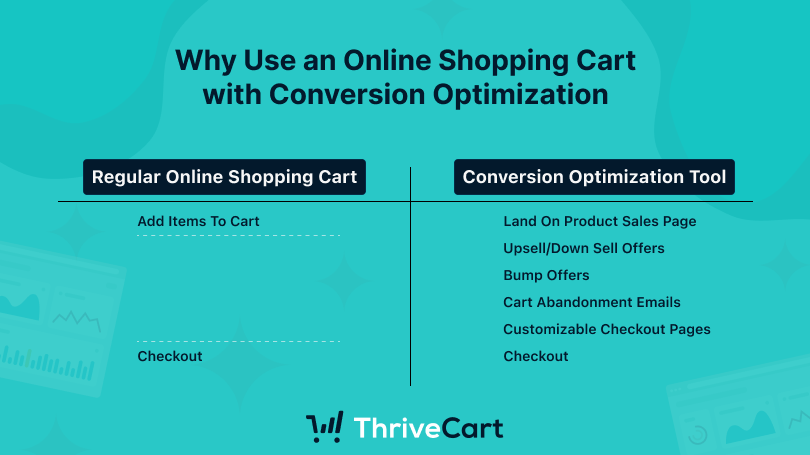
Online shopping carts are a basic requirement for an eCommerce store, but on their own, they are not particularly effective in boosting purchasing rates. Today most online shopping cart software will allow customers to add multiple things to their cart and then checkout. To truly enhance your final sales, you should also utilize more advanced eCommerce solutions for your online store.
Advanced options include:
- Upsell and downsell offers
- Bump offers, trials, and subscriptions
- Automated email notifications for expiring subscriptions
- Automated cart abandonment email marketing messages
- Customizable checkout pages and buy buttons
All of these features work together to reduce cart abandonment and increase total purchase prices. By adding a shopping cart with built-in optimization tools to your website or small business storefront, you can improve the customer experience, increase functionality, and generate more revenue.
Types of eCommerce Shopping Cart Software
Website owners and website builders can typically add a plugin to their site or a small snippet of HTML code to their product pages without needing to hire a web development team.
There are a few different types of online shopping cart software solutions you can deploy, including:
Licensed Shopping Cart
A licensed shopping cart is self-hosted. Experienced web developers and website owners buy a license to the shopping cart software and integrate it into their websites. While this provides the ability to highly customize your shopping cart, it also means you have the burden of managing, maintaining, and updating it. You’ll need to download the software, install it onto your web server, and then link it to all of your product pages.
Licensed shopping carts typically have a one-time payment, although some may have recurring fees.
Hosted Shopping Cart
A hosted shopping cart does not require any serious technical knowledge to use. The provider will manage the software itself, including maintenance and updates. You can still customize the look and feel of the online shopping cart to match your site or choose from pre-built templates.
A hosted online shopping cart is the simplest solution. You can manage everything from a web browser and embed the add to cart or buy now code or use a plugin so customers can access it wherever you want. Depending on the solution you choose, you might pay a one-time fee or a monthly fee and a percentage of sales revenue.
Open Source Shopping Cart
There are also open-source shopping cart solutions and the advantage is that it’s free to use. The downside is that you also need to manage, maintain, and secure it yourself. Most businesses require a web developer to integrate and manage an open-source shopping cart.
If an issue arises, you should plan on resolving it yourself. While some open-source solutions have user groups that pitch in to offer suggestions, there’s no formal support available.
CMS Plugins
There are also plugins that can be used with your content management system (CMS). While there may be limitations for use, plugins are typically free or available for a low cost. However, most have monthly fees or charge a percentage of sales depending on the volume for advanced features.
Plugins are popular tools for WordPress users. Since WordPress powers about 43% of all websites online — about 835 million websites — you can see why. Still, CMS plugins often have basic features and may or may not have robust support.
How to Add Shopping Cart Software to Your Existing Website
How you add shopping cart software to your site will vary depending on the type of software and the platform where your site is hosted. You will find detailed instructions for pairing your website and shopping cart software together in the help or support section of the solution that you choose; however, the following overview provides a general sense of the process depending on the type of online shopping cart you opt for:
- For Licensed and Open Source Online Shopping Carts: Download the software and host it on your website’s server or web hosting platform. Website developers will need to customize the code and add it to your site. Then, you will need to connect your payment gateways and add on any additional marketing tools you need to drive conversions.
- For Hosted Shopping Carts: Visit the platform’s website and set up your account and follow the step-by-step instructions. Most hosted shopping carts let you build out custom landing pages or product pages using a drag-and-drop editor. Once your shopping cart is configured, you can usually generate the code snippet you need to embed your shopping cart onto your existing website or anywhere else you sell products online. You can also cut and paste the code that’s generated into a WordPress widget.
As WordPress/WooCommerce is one of the most common combinations of website host with a traditional shopping cart solution where customers can browse and add a number of products to their cart at once, the following details outline how exactly to add WooCommerce to your WordPress site.
1. Install the WooCommerce Plugin
From your WordPress dashboards, you’ll want to navigate to Plugins and then choose Add New. In the search field, look for the WooCommerce shopping cart plugin and click Install Now. After the plugin is loaded and installed, you can click Activate, which will take you to the setup wizard.
2. Complete Plugin Setup & Add Products
The setup wizard will walk you through the process, asking for information about your business, your product mix, and how many products you want to display. WooCommerce gives you options to add products manually, import them from CSV files, or import them from another online store. This can be a bit challenging for storefronts that sell a large inventory of products as each will need to be added to WooCommerce.
3. Configure Product Pages
By default, WooCommerce will list all of your products in a layout that’s familiar to eCommerce shoppers. You see a grid of products but limited details. Add-ins, upgrades, and other plugins can help you customize the look to fit your preference. You can also buy themes that have different looks and features.
4. Configure Payment Options
Once your product pages are set up, you will then need to set up your payment options. WooCommerce will automatically do that for you and create pages for shopping cart pages, checkout pages, and account pages. WooCommerce accepts credit card payments from several different payment gateways, including Stripe, PayPal, Authorize.net, Amazon Pay, and other payment methods.
You can add the WooCommerce plugin to just about any WordPress site. Most sellers also use additional plugins or tools to enhance the WooCommerce offering for more advanced tools. For example, if you want to do bump offers, subscriptions, or one-click upsells, you’ll need additional tools.
How to Increase Sales with ThriveCart
ThriveCart adds advanced sales funnels and other marketing tools to your site to increase conversions and generate more revenue. It complements your shopping cart solution, providing a dedicated sales page for select products that you can direct traffic to. From there, you can show buyers related offers, upsells, and bump offers to stimulate additional sales right when they were already convinced to purchase your main product. That’s why so many eCommerce platforms and website sellers use ThriveCart in tandem with website shopping carts.
ThriveCart also does not charge any recurring monthly fees. For a flat fee, you get a lifetime account and ThriveCart’s hosted solution.
Here’s how easy it is to add ThriveCart to an existing website.
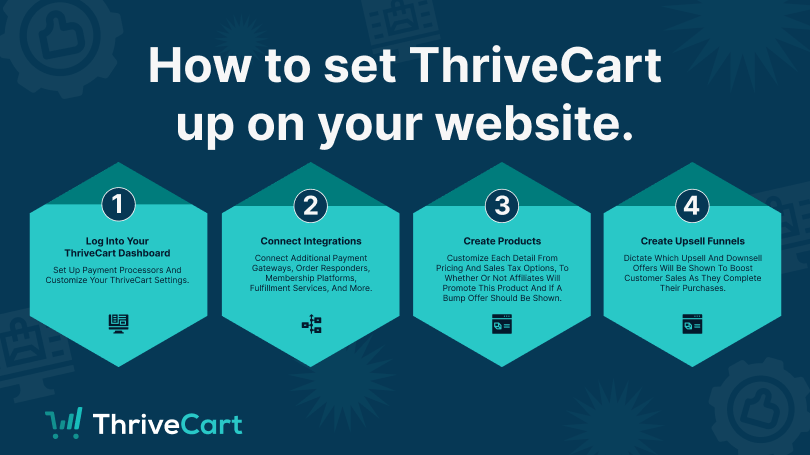
1. Set Up Your Dashboard
When you first log in, you’ll be prompted to set up your payment processors. Once that’s done, you’ll see the platform’s dashboard. The dashboard gives you direct access to the important metrics surrounding your sales, such as checkout views, orders, conversation rates, revenue, and refunds. You can also customize your settings and dashboard to highlight the most important metrics for you.
From your dashboard, you can set up your products, upsells, downsells, coupons, and affiliate marketing partnership rules. Adding affiliates gives them their own dedicated dashboard where they can access your product links to promote for you — no additional license is needed.
2. Connect Integrations
You’ll find integrations under your settings menu from the top right of the navigation bar. You can set up:
- Additional payment gateways
- Autoresponders
- Membership platforms
- Fulfillment services
- Select third-party apps
3. Create Products
At this point, you will create digital or physical products, selecting the individual settings for each product. This involves a series of smaller steps that allow for complete customization:
- Product Setup: Click to create a new product, choose whether it’s a digital or physical product, and fill out the options, such as product names for the cart and invoice, labels for your tracking, and the URL of the checkout page. You can set up products in test mode, launch to go live, or disable them.
- Pricing: Displays in multiple currencies with options to calculate sales tax automatically. Offer one-time fees, subscriptions, split-pay, pay your own price, and free trial periods.
- Bump Offers: Set up bump offers to encourage additional sales by showcasing additional options upon checkout.
- Payment Processing: Choose which payment processors will automatically populate on supported carts or devices. You can also set up affiliate programs, commissions, and target URLs.
- Fulfillment: Choose from options such as showing them a checkout invoice, sending them to a URL, adding them to a membership site, and displaying a success message. For physical products, you can also add shipping options.
- Checkout Process: Select your cart type (standard, sales cart, embeddable cart, or popup cart), and customize the web design of your cart using the drag-and-drop built-in editor.
- Tracking: Set up tracking services for APIs and integrations, such as Google or Facebook, or add custom tracking codes for individual or multiple pages.
- Behavior: Set up specific actions based on customer behavior, such as subscribing them to a course, or adding them to mailing lists using a rules-based engine.
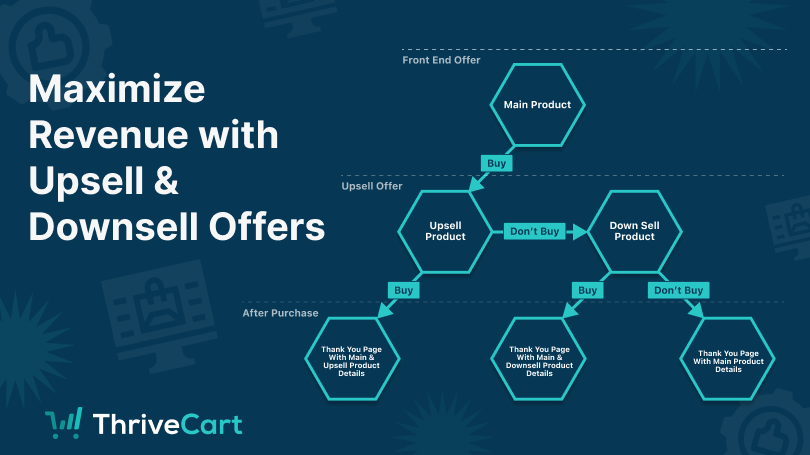
4. Create Funnels to Maximize Revenue
This is where you add additional offers to your main product in order to generate higher revenue. When you click on create a new upsell, for example, you can choose other products to feature or add new products. You can then set custom rules for what happens if a buyer accepts the offer or turns it down, and what downsell offers would then appear next.
Once you create the upsell opportunity, you would return to your product page, select the product where you want the upsell to display, and click to create a funnel. This ties the upsell offer to the product. You can then edit how your upsell page will look.
5. Direct Customers to Product Pages
With your specialized, highly converting product pages and marketing funnels built, you must now direct traffic to them – and there are two easy ways to do so.
One option is to simply embed the checkout directly into your website using the embed code provided when building the product page. It’s as easy as that. The other option is to link to the sales conversion page from a more standard or sales type shopping cart.
Both options are equally effective, and allow your interested customers to land on a purchase conversion process that seals the deal.
You may want to watch this short video to see the ThriveCart platform in action and just how easy it is to get started.
Go Beyond the Basic Shopping Cart Solutions
When building an online checkout experience for your customers, be sure to look beyond simply setting up a shopping cart software that takes customer payments. Instead, make sure your shopping cart of choice actively works for you by promoting your best products and increasing customers’ average order value.
The best shopping cart solutions will also have the sales funnels you need to show customers related offers. Dedicated conversion funnels based on customer behavior and purchases can drive significant upsells and increased revenue.
Learn more about how ThriveCart can help your eCommerce website and claim your special offer today.

 Our development team have been ...


